VMware ESX 3.5 and VC 2.5 Update 1 released

Hi VMware lovers,

If you are like me, you would have been waiting VMware 3.5 Update 1 release patiently, I am glad to inform you its finally here.

yes, yes, yes, it has fixed the MS Cluster support problem that many of us were suprised of it in  VMware ESX 3.5 before Update 1.

Many Many Many other good enhancement as well were included few examples below:

  • Support for Microsoft Cluster Service (MSCS) Support
  • Extends support for VMware High Availability (HA) to ESX Server 3i hosts
  • 10 Gigabit Ethernet – Support for the Intel 82598 10 Gigabit Ethernet Controller.
  • Newly supported guest operating systems RHEL 5.1, RHEL 4U6, SLES 9 SP4, & Ubuntu 7.10

The above four were the most looked for additions, but many others and more information can be found at the details below:

=================================================

 The VMware newly (re) built ESX and Virtual Center 3.5 Update 1 can be downloaded at

Download VMware ESX & Virtual Center 3.5 Update1 …

VMware ESX 3.5 Update 1

Latest Version: 3.5 Update 1 | 4/10/2008 | Build: 82663 | Release Notes

VMware ESXi 3.5 Installable Update 1

Latest Version: 3.5 Update 1 | 4/10/2008 | Build: 82664 | Release Notes

VMware Converter 3.0.3 (Standalone Enterprise Edition)

Latest Version: 3.0.3 | 5/6/2008 | Build: 89816 | Release Notes

================================================

You might want to start testing ESX 3.5 Update 1 now, before you enrol it in your infrastructure as it got many enhancment that you might desire.

Enjoy,

MrVirtualizaiton

Posted in Virtualization, VMware | Tagged | Leave a comment

From a Citrix Session Broker for Hyper-V

Hi,
In a VDI (Virtual Desktop Infrastructure) the Session Broker plays a key role. In particular its the software component that handles the authentication & Sessions of users seeking access to their virtualized desktops, and it help in ensuring the high availability of the solution and managing the pool of resources.

To date, Microsoft has its own Session Broker, but it has an agreement for close cooperation on this front (as on many others) with Citrix.

Yesterday Citrix has released XenDesktop v2.0 (do not be mislead by the numbers: you have not lost anything it is the first version), which offers one Session Broker able to use as a server virtualization XenServer, VMWare ESX and Microsoft Hyper-V (once available).

XenDesktop can be installed on Windows Server 2003 and will supports virtual desktops Windows XP and Windows Vista.

An interesting aspect of the product is its complete integration with System Center Virtual Machine Manager 2008. XenDesktop is made up of several elements that combined in different ways building the different packages available:

Xen Desktop Elements:

     * Desktop Delivery Controller (DDC or, in beta called Desktop Server)
     * XenServer as backend virtualization
     * Provisioning for the streaming servers
     * XenApp for applications virtualization 
     * AccessGateway which work as SSL VPN gateway
     * The suite of control EdgeSight
     * The QoS engine WANScaler
     * The remote operator GoToAssist
     * The VoIP Gateway EasyCall

These elements combine to give the following different editions:

  • Standard Edition: contains XenServer, Desktop Delivery Controller, Access Gateway
  • Advanced Edition: everything in the Standard Edition plus the Provisioning Server
  • Enterprise Edition: everything the Advanced Edition plus XenApp
  • Platinum Edition: everything in the Enterprise Edition plus EdgeSight, WANScaler, GoToAssist, and EasyCall

Also there’s an Express version, which is free. Its equal in functionality to the Standard edition, but limited to 10 concurrent users. You can also download the trial version of the other Editions.

WhataVM 🙂
Highly inspired by Giorgio article
Posted in Citrix Xen, MS Hyper-V, Virtualization, VMware | Tagged , , , , | Leave a comment

Time Synchronization & NTP on ESX Server

How can you configure the NTP setting on the Service Console

Time and virtual machines are not always a good marriage. The time in a virtual machine (VM) can fall behind, because the CPU cycles are divided over the VMs running on an ESX server.

You may have several ways to ensure that the time within a VM keeps running pretty well: using the VMware tools, or using a different timing mechanism. This article is about the first option: timing using the VMware tools.

If you use VMware tools timing, it is important that the time in the Service Console is accurate. This can be achieved by configuring NTP. Additionally, you have to ensure the timing option within the VMware tools is set to on (Checked). As well, it is important to only have one synchronization mechanism per VM to configure, more on this shortly.

Setting timing within the Service Console (+ VMs) consists of five steps:

  1. Configure the correct time zone within the Service Console
  2. Configure NTP daemon
  3. Firewall disabling (Only ESX3)
  4. Start NTP daemon
  5. Time synchronization for the VMs

These five steps will be described in detail below:

Step 1: Configure the correct time zone within the Service Console

If you have setup the timezone correctly when setting up your VMware ESX then you can safely skip this step. If you are not sure you can confirm by checking the content of /etc/sysconfig/clock and make sure it contains the following lines with your correct zone:

Zone=”Europe/Amsterdam”

UTC=true

ARC=false

If that mach then you can safely skip this step else you have to proceed with it.

Setting the time zone is as follows:

cp /usr/share/zoneinfo/Europe/Amsterdam /etc/localtime

This ensures that the correct time zone is set.

After that make sure the contents of /etc/sysconfig/clock contains the following lines:

Zone=”Europe/Amsterdam”

UTC=true

ARC=false


Note: This assumed that the hardware clock UTC used, if this is not the case then use UTC = false. As well It assumes that Amsterdam is the desired time Zone.

Step 2: NTP daemon configure

Please note in the following configuration we assummed your Time servers are as follow. Please replace these where ever founded with your NTP Server IPs or name (in many cases its the same as of your domain controllers):

0.pool.ntp.org
1.pool.ntp.org
2.pool.ntp.org


The NTP daemon can be configured as follows:

Ensure the contents of /etc/ntp.conf should contain the following lines:

restrict default kod nomodify notrap
restrict 127.0.0.1
server 0.pool.ntp.org
server 1.pool.ntp.org
server 2.pool.ntp.org
driftfile /var/lib/ntp/drift

The following images show an image of the ntp.conf file after the lines inserted in it. Please note the inserted lines in red.
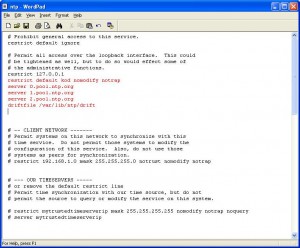
vmware vi3 ntp after changes

The contents of /etc/ntp/step-tickers should look like this:

0.pool.ntp.org
1.pool.ntp.org

2.pool.ntp.org

This step-tickers file is used by the program ntpdate. This synchronizes the time for the first time as the ntpd is started or restarted.

Also for NTP servers fill your own choosing.

Step 3: Firewall disabling (ESX 3.x)

Open the NTP Port through the firewall, so the NTP server can be reached:

esxcfg-firewall –e ntpClient

By default, the outgoing port for ntp is blocked. You may also open this port through the graphical interface.

Step 4: NTP daemon start

The NTP daemon can be started now, in addition we should also establish that the NTP daemon will be started automaticly after reboots:

Start NTP daemon:

service ntpd start

Ensure that the next time the server boot up the NTP service will start automatically:

chkconfig –-level 345 ntpd on

If the clock in the Service Consile not synchronized with a time server. Now the Service console clock can be synchronized with the hardwareclock:

hwclock –-systohc

The time on the ESX server runs now!
If all is well, the time on the ESX server is correctly running and aswell the time is adjusted.
In addition, its a good idea that you check the time and get it to sync with the command “ntpq -p” and “ntpdate -q ntpserver.org” after you have been done.

Step 5: Synchronise time on the VMs

The timing of the VMs can be controller by putting the check for timing within VMware tools on. Plus, you must ensure that there is only one synchronisation mechanism active per VM! This means windows machines time service should be stopped if you are going to use VMware tools timing.

In the case of a Domain Controller time service can not be stopped, you would for the next option to choose:
It is possible to use third-party software to synchronize with an external source outside of a forest, and still use W32Time to securely distribute time within the forest. You can do this by disabling synchronization while leaving W32Time active on the server. To do this, stop W32Time and install the third-party software on the PDC emulator in the forest root. Then disable the third-party software’s ability to serve time by setting the value for the Type entry to “NoSync” in the registry, and then restart W32Time. (HKEY LOCAL MACHINESYSTEMCurrentControlSetServicesW32TimeParametersType) The domain will be securely synchronized to the PDC emulator’s clock, while the PDC emulator’s clock will be using the third-party software to synchronize with an accurate source outside of the forest. .
(Source: microsoft.com)

This way you can make a successful DC sync with VMware Tools. If you prefer for member servers to automatically synchronize with these DCs.

Enjoy the correct timing on your VMs :).

Please leave me comments on here if you need any further help, or if you have something to add.

Posted in Virtualization, VMware | 9 Comments

Fedore Core 8 on Hyper-V not so easy as it seems.

As I have been going all over the web just as many of you are and trying to discover how to install Linux on Hyper-V, I have came up across zillions of posts which talk about it, but none who gave a full details of how to really fully implement it. I like how Virtual_PC_Guy have simpilized the installation of Fedore 8 on hyper-v in his article at installation of Fedore Core 8 on hyper-v .

He had made the installation of Fedore  8 on Hyper-v look so simple. Although its all the way true that you can install Fedore 8 on Hyper-V quite easily, to get the expected and claimed performance out of it is the hard part. To get paravirtualization in action and get the real performance out of it, you will have to install

1- Linux Integration components for Hyper-V

2- Paravirtualization Kernel

Doing the two above steps is not the easiest thing to do as the second one require a quite good Linux knowledge to compile the new kernel. Though unless you carry the above two step the performance of Linux hosts on Hyper-V will be so depressing and not much better than what you will get on MS Virtual Server 2005 R2.

I will be trying to document how to do the above two steps in a coming article after trying it. So keep looking.

Though if all you desire is just to get a look at installing Linux on Hyper-V and performance is not your main concern then the articled linked to at the beginning of my blog is all you need.

Posted in MS Hyper-V, Virtualization | 2 Comments

Welcome Aboard

Hi,

Our Team would love to welcome all of you aboard and thank you for visiting our Blog. Our blog has been lunched to the public on 01/04/2008 and we hoping it will be helpfull to as many people as possible.

Hope you enjoy & share the knowledge.

Best Regards,

ITComparison Team

Posted in Welcome Aboard | 3 Comments